Step 1 Add custom Object to DC Setup
- Navigate to DC Setup Page and under 'Object Setup' click on 'Add Object'.
.png)
- In the list that will appear, choose the 'Custom Object' you wish to use. In this example, we are using the custom object 'Price'
.png)
- After clicking 'Add' the object will appear in the Object Menu.
Step 2 Create a custom DC Check button in Salesforce Classic
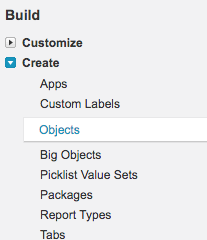
- Navigate to the Salesforce 'Setup' page and search for the 'Objects' page in the search box or look for it manually under Build - Create - Objects.
- Now when you are in the 'Objects' page, find the custom object you want to use and click on it. Now under 'Custom Object Definition Detail' copy the API name.
- Scroll down to the 'Buttons, Links and Actions' menu.
Click on the 'New Button or Link' button.

Fill out the form using the details in the example below. Copy and paste the code below.
Replace *API_NAME* with the API name that corresponds with your (custom) Object.{!URLFOR('/apex/dupcheck__dc3Check?Id='+*API_NAME*.Id)}.png)
Click 'Save'. Your DC Check custom button for Salesforce Classic is created.
Step 3 Add the DC Check button to your custom Object Layout
- To add the DC Check custom button to your custom object page layout navigate to the Salesforce 'Setup' menu.
- Navigate to the Salesforce 'Setup' page and search for the 'Objects' page in the search box or look for it manually under Build - Create - Objects.
.png)
- Now, find and open the *Custom Object* to which you wish to add the DC Check button to. For this example, we will use the custom object 'Price'
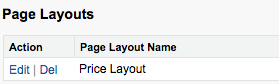
- Navigate to the 'Page Layouts' menu and click 'Edit' on the '*Object* Layout'.
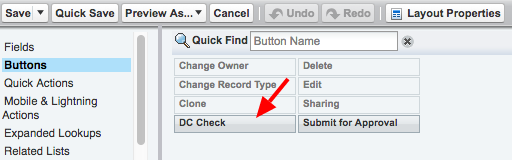
- From the 'Buttons' menu, drag and drop the 'DC Check' button to the custom button section below, which will be highlighted in green when you drag the button.
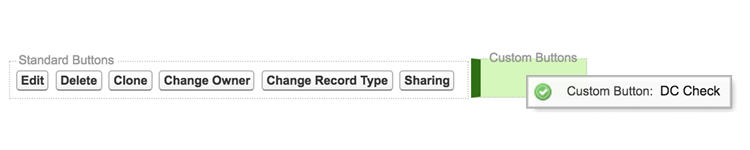
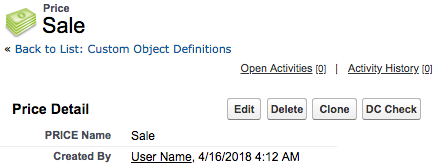
- Click 'Save'. You have added the DC Check Custom button to your *Custom Object*. Here is an example of how it looks added to the custom object 'Price':
Step 4 Create a custom DC Merge button in Salesforce Classic
- Navigate to the Salesforce 'Setup' page and search for the 'Objects' page in the search box or look for it manually under Build - Create - Objects.
.png)
- Now when you are in the 'Objects' page, find the custom object you want to use and click on it. Under 'Custom Object Definition Detail' you will see the API name of the *Custom Object*. Copy the API name.
- Scroll down to the 'Buttons, Links and Actions' menu.
Click on the 'New Button or Link' button.
.png)
Fill out the form using the details in the example below. Copy and paste the code below. Replace *API_NAME* with the API name that corresponds with your (custom) Object.
var selRecords = {!GETRECORDIDS($ObjectType.*API_NAME*)}; var url = '/apex/dupcheck__dc3Merge?&ids=' + selRecords; window.location = url;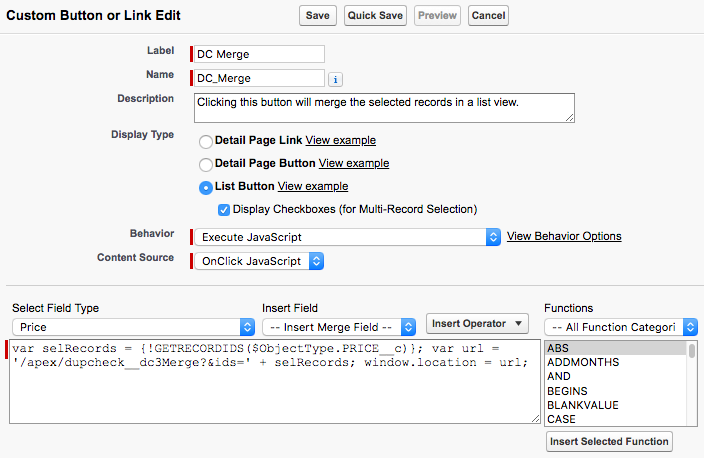
Click 'Save'. You have added the DC Merge button to your *Custom Object*
Step 5 Create a 'Disable Duplicate Check' checkbox in Salesforce Classic
- Navigate to the Salesforce 'Setup' page and search for the 'Objects' page in the search box or look for it manually under Build - Create - Objects.
.png)
- Now when you are in the 'Objects' page, find the custom object you want to use and click on it.
- Scroll down to 'Custom Fields & Relationships' section and click 'New'
- Under 'Data Type' select the 'Checkbox' and then click 'Next'
.png)
- Enter the following settings and click 'Next'
Field Label: Disable Duplicate Check
Field Name: dc3DisableDuplicateCheck.png)
- Depending on your Salesforce edition (Professional and up), you will now get a screen to establish field-level security. Decide who may see the Disable Duplicate Check button and click 'Next'.
- Depending on your Salesforce edition (Professional and up), you will now get a screen where you are able to add the Disable Duplicate Check button to the page layout. Add the button to the pages you would like.
- Click 'Save'. You have successfully created and added the 'Disable Duplicate Check' checkbox to your custom object layout.
Step 6 Create the Apex Trigger
Click here to watch a short example video with the "Offer" Object, showing the following steps.
- Navigate to the Salesforce 'Setup' page and search for the 'Objects' page in the search box or look for it manually under Build - Create - Objects.
.png)
- Now when you are in the 'Objects' page, find the custom object you want to use and click on it.
- Scroll down to the 'Triggers' section and click 'New'.
- Replace all code in the box with the Apex Trigger code below. Make sure you replace *OBJECT_NAME* and *OBJECT_API_NAME* with the name and API name of your Custom Object.
trigger dc3*OBJECT_NAME*Trigger on *OBJECT_API_NAME*(after delete, after insert, after undelete, after update, before insert, before update) {


    dupcheck.dc3Trigger triggerTool = new dupcheck.dc3Trigger(trigger.isBefore, trigger.isAfter, trigger.isInsert, trigger.isUpdate, trigger.isDelete, trigger.isUndelete);
    String errorString = triggerTool.processTrigger(trigger.oldMap, trigger.new);


    if (String.isNotEmpty(errorString)) { trigger.new[0].addError(errorString,false); }
}
This is an example of the code with the custom object 'Price'trigger dc3PriceTrigger on PRICE__c(after delete, after insert, after undelete, after update, before insert, before update) { dupcheck.dc3Trigger triggerTool = new dupcheck.dc3Trigger(trigger.isBefore, trigger.isAfter, trigger.isInsert, trigger.isUpdate, trigger.isDelete, trigger.isUndelete); String errorString = triggerTool.processTrigger(trigger.oldMap, trigger.new); if (String.isNotEmpty(errorString)) { trigger.new[0].addError(errorString,false); } } - Click 'Save'. You have successfully created the Apex Trigger
